Usage
Adding a License
To ensure data files offered by your Tripal site meet FAIR data principles, all files must be associated with a license. Therefore, before adding files, you must first create new License content types. You can create as many License files as needed for the data on your site.
To create a new license page, navigate to Admin > Add Tripal Content Types and scroll to the bottom of the page where the Other category is found. There you will see the License content type. Click the link to create a new license page.
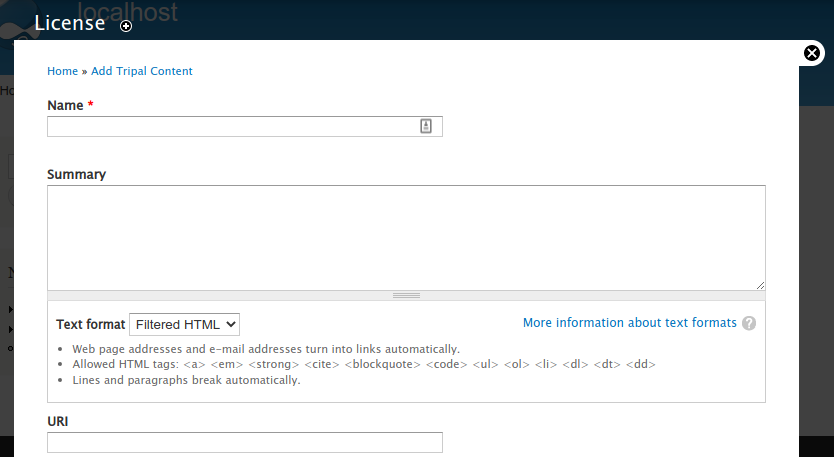
To create your license page you can:
Option 1: Fully define the license by giving it a name and provide the full description
Option 2: Summarize the license by giving a name, providing a brief summary (or no summary) and providing the URL to the full license online.
Note
It is best practice to provide a human readable summary of the user’s rights in the Summary field and to provide a link to the full legal text of the license via the URI field.
Example Licenses
A few example licenses are provided below along with the values that may be appropriate for the License page fields.
Public Domain Data
Data that is public, where no on retains rights to it. Therefore, it needs a license page even though “public domain” is not an actual license. You can use the following values when creating a public domain license page:
Field |
Value |
|---|---|
Name |
Public Domain |
Summary |
The data has no known copyrights or restrictions and can be be freely used by anyone. |
CC0 1.0 Universal (CC0 1.0)
The text for the summary below came from https://creativecommons.org/publicdomain/zero/1.0/.
Field |
Value |
|---|---|
Name |
CC0 1.0 Universal (CC0 1.0) |
Summary |
The person who associated a work with this deed has dedicated the work to the public domain by waiving all of his or her rights to the work worldwide under copyright law, including all related and neighboring rights, to the extent allowed by law. You can copy, modify, distribute and perform the work, even for commercial purposes, all without asking permission.
|
URI |
Attribution 4.0 International (CC BY 4.0)
The text for the summary below came from https://creativecommons.org/licenses/by/4.0/.
Field |
Value |
|---|---|
Name |
Attribution 4.0 International (CC BY 4.0) |
Summary |
You are free to:
The licensor cannot revoke these freedoms as long as you follow the following license terms:
Notices:
|
URI |
Adding a File
To demonstrate adding a file, we will provide an example using the genome files that are provided in the Tripal User’s Guide in the section titled Setup of an Example Site. Those instructions direct the reader to create an Analysis page to represent the whole genome assembly of the Citrus sinensis v1.0 genome. We will associate the files to that analysis. If you have followed along with the Tripal User’s Guide you will already have those files uploaded.
If you have not followed the Tripal User’s Guide but would like to follow along here, you must follow these instructions to create an Analysis page. And obtain the files here:
To create a new file page, navigate to Admin > Add Tripal Content Types and scroll to the bottom of the page where the Other category is found. There you will see the File content type. Click the link to create a new file page. The following page appears.

On this page you can:
Provide a name (required) and description for the file.
Indicate a file type (required).
Indicate the file source (or contact person) who was rights to the data.
Indicate the file location (either locally or via remote URL).
And set the license (required).
First, we will create the whole genome FASTA file page. Enter the following in the File page fields:
Field |
Value |
|---|---|
Name |
Citrus sinesis Whole Genome Assembly v1.0 |
Description |
The whole genome assembly, v1.0, of Citrus sinensis. |
Type |
FASTA |
File Source |
Leave blank or provide any contact you may have already |
Location |
Citrus sinensis-scaffold00001.fasta |
File License |
Select whatever license you may have already added |
If you already have the file uploaded to Tripal then it will automatically appear in the Tripal Managed File section:
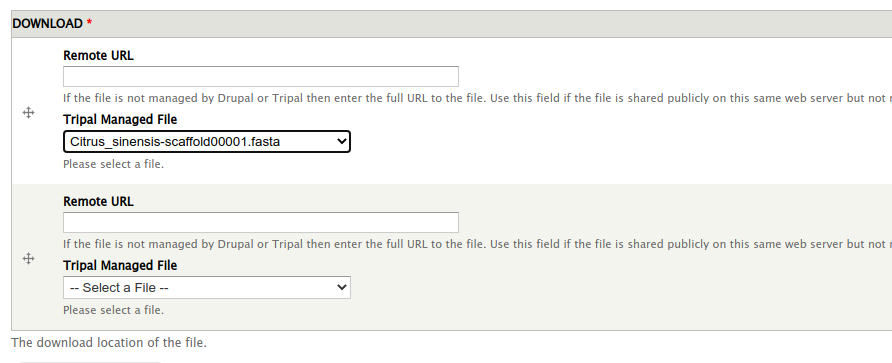
Otherwise you can provide a remote URL for the file. If you have files on your site that are not managed by Tripal, you can use a URL here that points to the full path on your site. In both of these cases file size and md5 checksum cannot be automatically generated. Alternatively, you can use a public:// prefix for local files, in which case the file size and md5 checksum can be automatically included. As an example, you might upload a file to your local filesystem in the directory sites/default/files/bulk_data/ and then you could specify a Remote URL of public://bulk_data/Citrus_sinensis-scaffold00001.fasta
Note
A file can have more than one download location, and you can combine both local and remote files.
Note
Providing a file source or “contact” is optional, but is recommended. Every file with a license should indicate, via the “file source” field, who retains the license rights (if applicable).
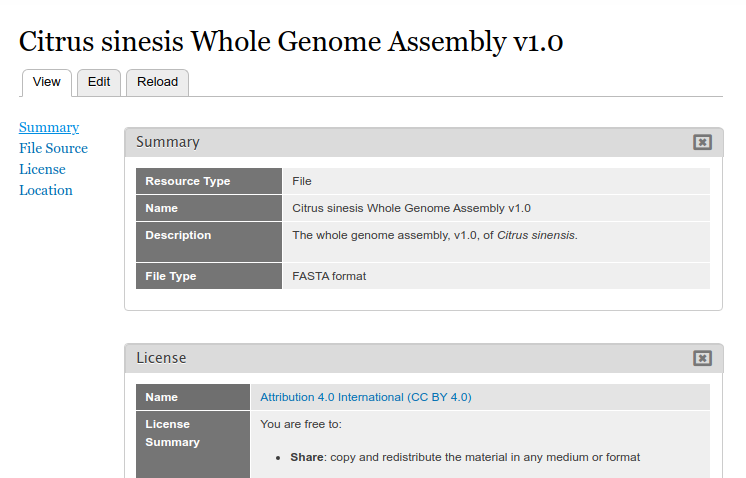
After creation, the file page appears:
Adding File Metadata
Manually Adding Metadata
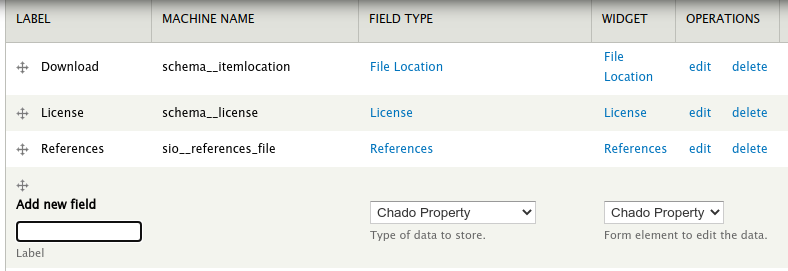
You can add additional metadata to a file by adding new fields to the file content type. To do this, navigate to Admin > Structure > Tripal Content Types and click the manage fields link in the File row. Scroll to the section titled Add new field. The field Type and field widget should be Chado Property:
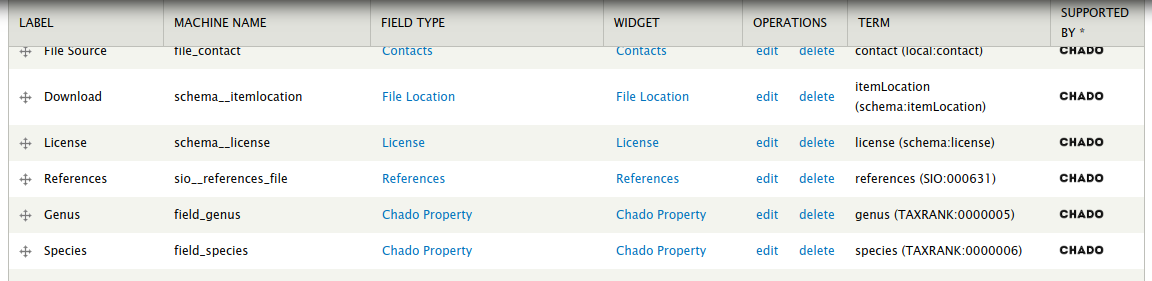
Name the property according as needed. Suppose we wanted to add a genus and species property to each file as metadata. We would add each one by first providing the name and clicking the Save button at the bottom. Next, Tripal provides a page for more details. Here the most important setting is the Controlled Vocabulary Term. To ensure data meets FAIR standards all metadata must be associated with a controlled vocabulary term. Here, we can search for and select the term genus and click the save settings button. We can repeat this step for the species. Once completed we should see two new fields associated with our File content type.
We now have two new fields that can be used for metadata but we must make those visible on the page when data is present for them. You can follow the instructions for Configuring Page Layout in the Tripal User’s Guide to place these new metadata fields where you want on the page. For this example, we will pace them in the Summary section of the page layout.
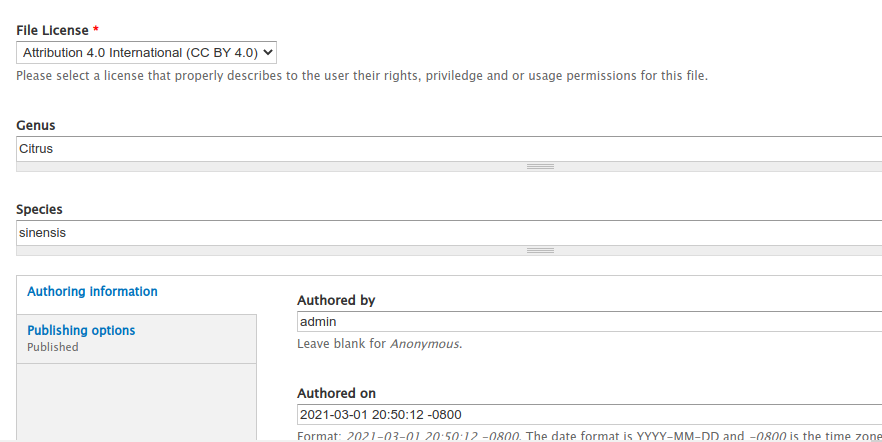
If we return to the any File page and edit it then we will now have a new metadata field for storing the genus.
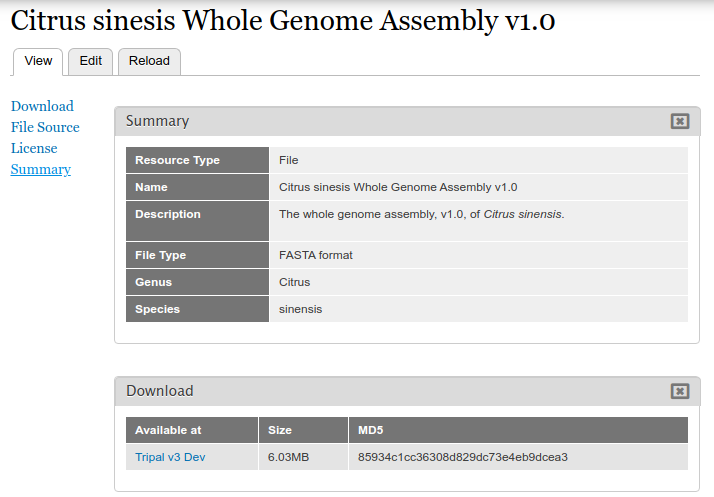
Now when we view the page we can see the genus and species metdata for the file
Adding Metadata in Bulk
Because there is no common file format for providing metadata the best way to add metadata in bulk is to use the Tripal Bulk Loader, a module that comes built-in to Tripal v3. You can find a tutorial for learning to use the bulk loader at the Bulk Loader tutorial of the Tripal User’s Guide.
Use of the bulk loader requires a good understanding of Chado, its database tables, their constraints and relationships. If you are comfortable with Chado, you can use the Tripal bulk loader to add metadata about files using a tab-delimited file. To do so you need to
Identify controlled vocabulary (CV) terms for each metadata value.
Ensure that those CV terms are already in Tripal and if not, you need to add them.
Create a tab-delimited file that contains the file name used in Tripal and as many columns of metadata values as desired.
Create a bulk loader template to recognize the file and import it.
The following provides the schema for the file and fileprop tables that were added to Chado by the Tripal File module. The fileprop table is where you will add metadata values.
File Module Chado Tables
The file Table
The file table houses the base file record. The name field must be a unique value for each file and thus can be selected on for finding files.
Column |
Type |
Null |
Default Value |
Constraint |
|---|---|---|---|---|
file_id |
integer |
No |
(auto) |
Primary Key |
name |
text |
No |
Unique |
|
type_id |
integer |
No |
Foreign Key to cvterm |
|
description |
text |
Yes |
The fileprop Table
The fileprop table holds the properties or metadata about files. The CV term is specified using the type_id column and the rank is incremented if multiple values of the same type are stored.
Column |
Type |
Null |
Default Value |
Constraint |
|---|---|---|---|---|
fileprop_id |
integer |
No |
(auto) |
Primary Key |
file_id |
integer |
No |
Foreign Key to file |
|
type_id |
integer |
No |
Foreign Key to cvterm |
|
value |
text |
Yes |
||
rank |
integer |
No |
0 |
The fileloc Table
The fileloc table indicates where files can be downloaded. The uri column must contain the URI of the file. Even local files have a URI. For example a Drupal URI usually has a public:// URI prefix. For example: `public://tripal/users/1/Citrus_sinensis-scaffold0.fasta`. When a file has more than one location to download the can be ordered by setting the rank column. The Tripal file module automatically fills in the size and md5checksum values for local files. If you are adding file locations via the bulk loader you must provide these or the will not be available.
Column |
Type |
Null |
Default Value |
Constraint |
|---|---|---|---|---|
fileloc_id |
integer |
No |
(auto) |
Primary Key |
file_id |
integer |
No |
Foreign Key to file |
|
uri |
text |
No |
||
rank |
text |
No |
0 |
|
md5checksum |
integer |
Yes |
||
size |
char(1024) |
Yes |
Associating a File with Other Content
Now that we have a file page we can associate that file with any other Tripal-based content. As stated earlier, we will follow the User’s Guide example where an Analysis page for the Citrus sinensis whole genome page was already created. We will associate the whole genome FASTA file to the analysis page.
Before we can associate a file with an analysis, we must first add a new field for the file to the Analysis content type. Navigate to Admin > Structure > Tripal Content Types and click the manage fields link in the Analysis row.
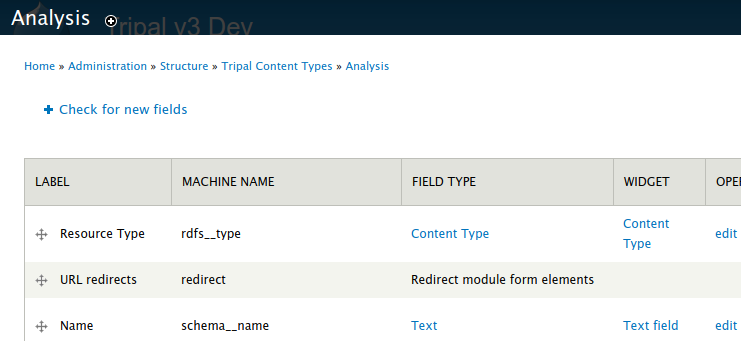
Click the Check for new fields link. Unlike adding fields for Metadata, the Tripal File module can automatically add fields for files. You should see the following message after clicking the link:
Added field: sio__file
Once again we must tell Drupal where on the page to display this new field. Follow the instructions on the Configuring Page Layout of the Tripal User’s guide to learn how to do this. For this example, we will use the Tripal Default Display option to automatically place the file field.
Note
You may be asking, why do I have to add the field then set the display? Why can’t the module do it automatically? The reason is that Tripal supports full customization of every page by the site admin and the Tripal File module does not want to make any assumptions about when and where any fields will be displayed. So the site admin must add them manually.
Next, find the Analysis page via Admin > Find Tripal Content. If you followed the Tripal User’s Guide it will be named “Whole Genome Assembly and Annotation of Citrus Sinensis (JGI)”. But if do not have this page, any practice Analysis page will do. Edit the page and scroll to the new section titled File. You should see a drop down containing a list of available files.
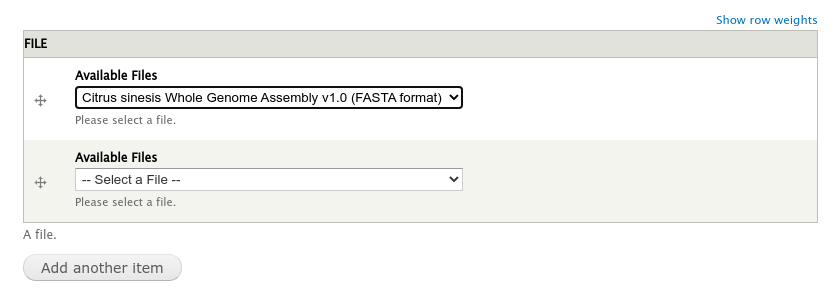
Select the file and click the Save button at the bottom. We now have a File item for the page.
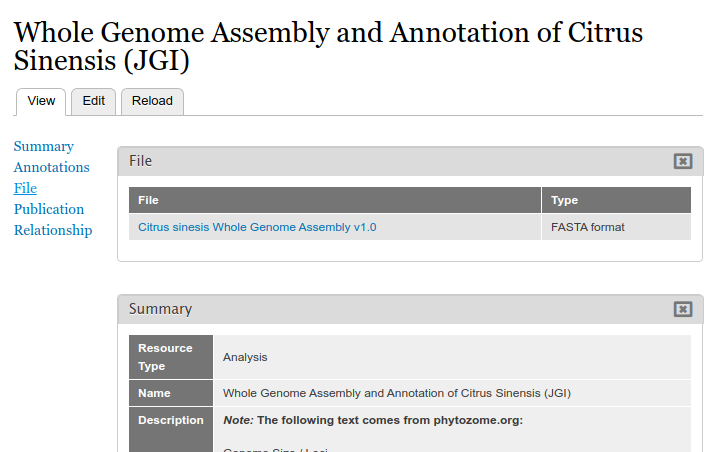
Clicking the file link will take the user to the full file page where they can download the file, view the license information, and view metadata about the file.
Accessing Files via Web-Services
All information about files can be obtained via the built-in Tripal Content web services. You can learn about how to access Tripal web services via the Web Services page of the Tripal User’s Guide. When web services are enabled you can:
Retrieve the list of files associated with any content.
Retrieve all information about a file, including its name, description, license, source, download locations and metadata.
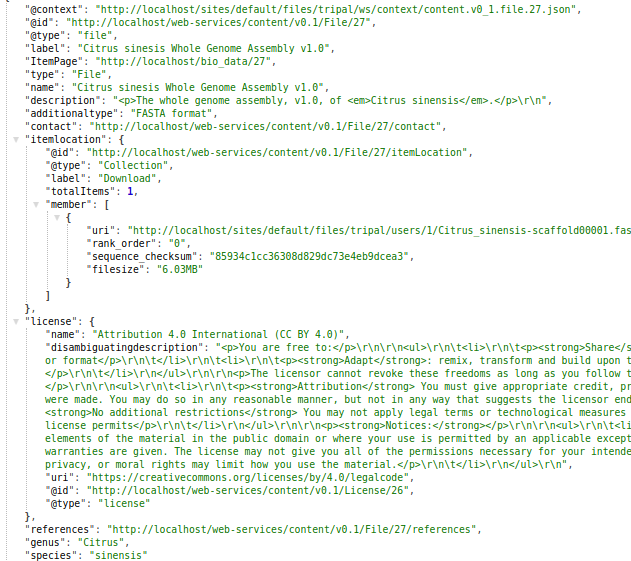
The following screen shot provides an example of the JSON returned for the Analysis content to which we associated the genome file:
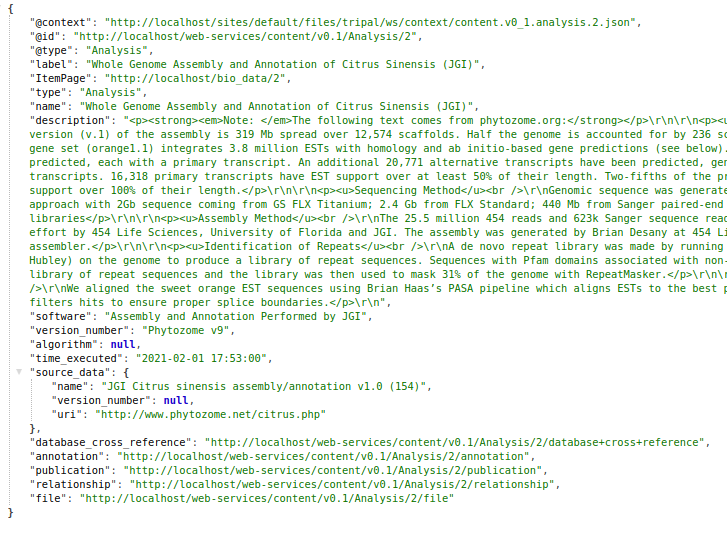
Note, the file key at the bottom of the JSON output? Following this URL provides information about the file. If more than one file is associated with the content then an array of files is provided.
Below is a screenshot of the JSON result for the file: